ܘܠܦܘܠܓܐ ܕܡܘܬܐ
ܐܝܬ ܗܘܐ ܕܝܢ ܫܢܝܐ ܘܠܝܘܢܢ ܕChina
ܐܠܦܐ ܕܝܢ ܕܝܢ ܕܡܛܝܒܐ ܕܪܝܫ
Phon: 400-964-1314
ܨܐܕܐ ܕܡܘܬܐ 86 13904053308
ܗܘ ܕܝܢ ܐܤܛܕܘܬܐ ܘܡܫܚܠܦܐ
2025-10-09 1697
Planning and Pathway PreparationWww.adsscable.cn
Thorough planning is the most critical phase. You must first determine the cable route, avoiding sharp bends and potential sources of damage. Interestingly, a 2022 Fiber Broadband Association report found that over 60% of installation issues stem from poor initial planning. Calculate the total cable length, including service loops, and select the appropriate cable type for the environment.
For instance, outdoor cables require different jackets than indoor plenum cables. Don't forget to secure all necessary permits. We learned this in a 2024 project where a two-day delay was caused by an overlooked municipal permit.
Cable Pulling and Tension Management
Once your pathway is ready, the physical installation begins. Always use proper cable pulling equipment, like a swivel and a tension meter. The golden rule is never to exceed the cable's maximum pulling tension. Exceeding this limit can cause microscopic cracks in the fragile glass fibers.
You should also use dedicated fiber pulling lubricant to reduce friction. Pull the cable smoothly and steadily, avoiding any jerky movements. It's helpful to have a communication system between the pulling and feeding teams.
Splicing and Termination Techniques
This is where precision is paramount. You have two main methods: fusion splicing and mechanical splicing. Fusion splicing, which melts the fibers together, offers a lower-loss, ܝܬܝܪܐܝܬ permanent connection. It's the preferred method for long-haul and high-speed links.
Mechanical splicing is faster and requires less expensive equipment, making it suitable for quick repairs. However, it typically has higher signal loss. Properly cleaving the fiber is a non-negotiable skill for either method. A bad cleave will guarantee a bad splice.
Fiber Optic Installation: Fusion vs. Mechanical Splicing
| Project A: Fusion Splicing | Project B: Mechanical Splicing |
|---|---|
| Very low insertion loss (0.1 dB typical) | Higher insertion loss (0.3 dB or ܝܬܝܪܐܝܬ) |
| Higher initial equipment cost | Lower equipment cost |
| Requires ܝܬܝܪܐܝܬ operator skill | Faster, easier to master |
| Highly reliable, permanent connection | Can be reconnected or temporary |
| Best for: Backbone, long-distance, data centers | Best for: Emergency repairs, FTTH, short links |
The Installation Process: A Step-by-Step Guide
Let's break down the core installation process into five actionable steps.
Step 1: Route Survey and Design. Walk the entire pathway. Identify obstacles, measure distances accurately, and document everything. This is your blueprint for success.
Step 2: Gather Materials and Tools. Based on your design, procure the correct cable, connectors, conduit, and hardware. Ensure you have all test equipment ready.
Step 3: Pull the Cable with Care. Attach the pulling eye correctly and use lubricant. Use a team to feed the cable smoothly to prevent kinks. Monitor tension constantly.
Step 4: Splice and Terminate Fibers. In a clean environment, strip, cleave, and splice the fibers. Protect each splice with a sleeve and place it in a splice closure or patch panel.
Step 5: Test and Document Everything. This is not optional. Use an OTDR and power meter to test for loss and verify performance. Create as-built drawings for future reference.
Common Installation Pitfalls and How to Avoid Them
⚠ Warning: One of the most common and damaging mistakes is ignoring the bend radius. Bending a fiber cable too tightly causes "macrobending" loss, which can severely degrade or even kill the signal. Always follow the manufacturer's specified minimum bend radius, both during installation and for the final routed cable.
Another frequent error is poor cable management. Cables should be neatly routed and secured without being crushed or pinched. Contamination is the enemy of optical connections. Always keep dust caps on until the moment of connection.
Conclusion and Pre-Activation Checklist
A flawless ܦܪܨܘܦܐ installation is a methodical process that blends careful planning with skilled execution. By following these proven steps and avoiding common errors, you can build a network that delivers peak performance for years to come. Before you power up your new link, run through this final checklist.
Pre-Activation Checklist:
All cable runs are within specified length and bend radius limits.
All splices are completed, protected, and stored in organized closures.
Connector end-faces are cleaned and inspected with a microscope.
OTDR trace shows no significant reflective events or loss spikes.
Insertion loss measured with a light source and power meter is within the link budget.
All patch panels and enclosures are properly labeled and secured.
Documentation, including test results and as-built drawings, is complete.
Www.adsscable.cn
Frequently Asked Questions (FAQs)
Q1: What is the single most important factor for a low-loss fiber installation?
A1: The cleanliness of the connectors. Dust and oil on the fiber end-face are the leading causes of signal loss and reflection. Always inspect and clean every connector before mating.
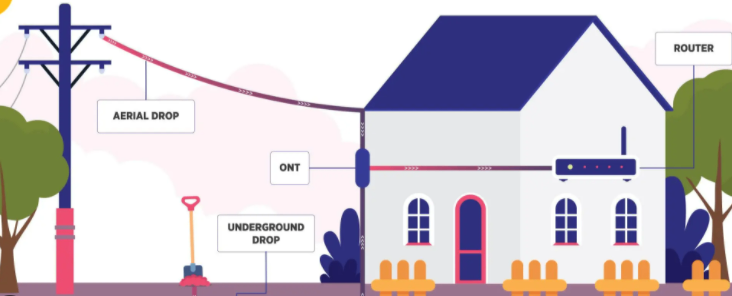
Q2: Can I use the same cable for aerial and underground installation?
A2: No. Aerial cables are built to withstand tension and UV exposure, while direct-burial cables have armor to resist moisture and crushing. Using the wrong type will lead to premature failure.
Q3: How often should I test the fiber after installation?
A3: You must perform full acceptance testing immediately after installation. After that, periodic testing is recommended every 1-2 years or after any major network changes to monitor for degradation.
Q4: What does a "reflector" or "peak" on my OTDR trace mean?
A4: A reflector, like the "ghost" from the article, is a sharp upward peak on the trace. It usually indicates a poor mechanical connection, a dirty connector, or a break in the fiber that is reflecting light back to the source.
Q5: Is fusion splicing worth the extra cost and training?
A5: For any permanent, high-performance installation like a network backbone or data center link, yes. The superior reliability and lower signal loss of a fusion splice far outweigh the initial investment.